Sponsors

 photo 8e821ffd-bdb3-44b0-8df1-888119dd6850.jpg

New Hair Resolution!!


Happy New Year!!!!

I hope 2012 will be a wonderful year for all of you!!

I decided that with my New Year Resolution, I will also include a *New Hair* Resolution when it comes to my and my daughters hair. My New Hair Resolution will be.... to begin teaching N how to properly care for her hair, even though she is 6 she can begin to learn the basic steps ex. first we shampoo and we will do it every saturday/sunday and we always use a conditioner and etc.
Even though, I wish she would stay young forever, she is growing up !! That's our New Hair Resolution, whats yours?

Product Review- Batiste Dry Shampoo


Batisite Dry Shampoo, with a refreshing fragrance, it revitalises greasy, dull and lifeless hair between washes. Instantly leaves your hair feeling clean, full of body and smelling beautiful. It transforms your hair without water. It's quick and convenient to use whenever you are. Check out their website http://www.batistehair.co.uk/

Directions: Shake Can Vigorously Before Use And In-Between Sprays. Hold can approximately 30 cm from hair and spray lightly, giving even coverage. Use fingertips to massage through hair and leave for a few moments. Brush product out, preferably using a natural bristle brush.


Thank you Batisite for allowing me to review your product!!

Product Review: When I heard of a product that would clean my hair without using water, I began to get super excited. It's mostly because I'm semi-lazy at times when it comes to my hair, I sometimes wish I could just wake up and look like Beyonce with 0 effort lol. So I thought this product would be the solution. Once I opened the can I quickly went to smell the product, I love a great smelling product, and I was pleased with the lightly scented citrus aroma. The application was very easy to use, just point and spray. But once I sprayed the front of my hair, I looked into the mirror, and saw a big white streak, which looked like baby powder. I stared at it, waiting for it to disappear, and blend in with my hair color, and nope, it was still there. I even tried combing and brushing it, and it was very hard to do. Then, I rubbed the streak and my hair felt very dry. As if, there were zero oils in my hair.  I would have to apply extra oils to bring my hair back to life, but the best part is my hair had 0 frizzies, like I would of had, if I used another shampoo. Overall I believe this is a great product for someone with fine hair. I was notified before using the product that it wasn't ideal for African American Hair, but I wanted to give it a try :-( It's very quick and easy to use, and it gets rid of oils, but for thick curly hair, I wouldn't recommend it. It didn't work to well for me, but everyone is different, but, if they did create another product, designed for more ethnic hair types, then I would love to give it a second try.

GIVEAWAY TIME!!!  Thank you Batiste for generously offering a giveaway to one of our lucky followers, who will win one can of Batiste Dry Shampoo Blush Scent. Here's how to enter the giveaway!!

The giveaway is only available to those who live in the US and Canada

- You must leave a separate comment for each task you complete, under this post.

1.) Follow our blog (if you are already following, leave a comment telling me you are.)

2.) Become a follower on Twitter.

3.) Advertise the giveaway on your Blog, Facebook Page, Website, Twitter or other forums. (leave a separate comment for each place you advertised)

4.) Grab our button, and if you are using the button, leave a comment with the link to the website/blog.

5.) Leave a comment on a previous post.

The winner will be chosen by RANDOM.ORG on JANUARY 9TH !!
-If the winner doesn't respond by January 13th, I will choose another winner.

Disclosure: the product was sent to me free of charge from the company for the purpose of the review, the opinion of the product is my own.

School Styles 25 Minutes Or Less

Here is a quick cute Two Bun Style, please ignore the crooked part going down her hair. She had pajama day at school. I didn't care too much about her part being straight lol.


1.) Start off with well moisturized hair.
2.) Make a part going straight down the middle of her hair.
3.) I took a ponytail holder and put it in one section, to make a ponytail.
4.) I made a two strand twist, and then I wrapped it around to form a bun.


5.) Next, I added another ponytail holder, to help hold the bun in place.
6.) Finally, I added a cute pink bow on top of the ponytail.
7.) I followed step #3-#6 on the other side of her hair.


Tools Used:
-Wide Tooth Comb
-Two Ponytail Holders
-2 Pink Bows

I hope everyone is enjoying this Holiday Season!!!

HAPPY HOLIDAYS


HAPPY HOLIDAYS EVERYONE!!!

I hope everyone is having a very happy holiday, We thank you all for following our blog we appreciate each and everyone of you, from our family to yours.

Happy Holidays!!
-Be safe and have fun !!

Also I promised, once we reached 100 followers we would have a GIVEAWAY!! After the holidays I have a few surprises, so keep checking in. 2011 will be filled with many new things !!

Cool Hair Facts :-)

Next to bone marrow, hair is the fastest growing tissue in the human body.

-hmm interesting!!

Hair Independence

Im not too sure what is getting into "N"? She is now 6 and I believe she is becoming more independent. Once in a while, I let her hair have freedom. I won't comb or add barettes, I let her hair be completely free. "N" wanted to march to her own drum, she wanted a hairbow. She asked her dad to put one in, but he has no clue how to add bows or anything. So she went and did it herself, and here's the results...


I couldn't remove the bow without cutting it out lol

"N" Salon Visit

"N" had her first trip to "Beautiful U Salon" for our Diva Day! She truly enjoyed being pampered like a princess. She had her hair washed and then styled, no heat/ chemicals. Even though she had to sit on a little stool, she felt like a little woman.

"N" on Diva Day


Aww her feet can't touch the floor lol

Looking at the final results :-) 

Criss-Cross Applesauce Hairstyle


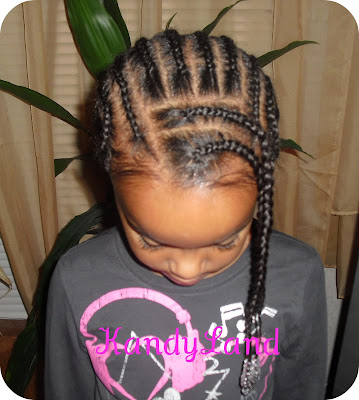
I had no idea what to call this style. I was going to call it criss-cross cornbraid, with two layered cornbraids in the back. Then wonderful silly "N" said Mommy lets call it "Criss-Cross Applesauce" lol. It sounds better than the long title I chose so here's how to do the Criss-Cross Applesauce Hairstyle.


1.) Start with clean moisturized hair, part the hair slightly-slanted across the hair (from ear to ear but purposely off a little bit. )
2.) Separate the back from the front (using a hair scrunhcie or clip), we will use the back later.
3.) Next, I made 2 slanted cornbraids starting on her left side towards the front of her hair, going down across the middle of her hair.
4.) Starting on the right side I made 5 slanted cornbraids, going across the middle of her hair (in the opposite direction from step# 3.


5.) In the front (roughly where a bang would be) I made 2 cornbraids going towards the left. Then I made one more cornbraid behind the bang on the left.
6.) I unraveled the back of her hair and divided it, into two parts.
7.) I began making two separate rows/layers of corn braids going down.
Then I connected the last braid in step#5, to one of the braids in the first row in the back of her hair. This caused the hair to have a criss-cross effect.


8.) Then "N" picked out the color beads that she wanted to use ( I know they don't match lol, but it did have a Jamaican feel)
and I added the beads to her hair.


Tools used: Wide Tooth Comb
Bee Mine Juicy Spray (for shine)
Bee Mine Curly Butter (to help lay down the frizzies)


Kandy's (?) Time

What is your favorite hair care product?

School Styles 25 Minutes or Less

I wanted to start a new segment in KandyLand, I know there are many busy Mothers who follow KandyLand and they need a quick cute style to do. So as of today, KandyLand will begin posting a style that take 25 minutes or less.

*If any of you have a style that was quick and easy to do feel free to email me kandylandkurls@yahoo.com with the pictures and the style will be featured.


Here's how to achieve this style!

1.) Part the hair in half (from ear to ear)
2.) Use something to separate the bottom section from the top, we will use the bottom later.
3.) Take the top section and divide it straight down the middle.
4.) Add hair scrunchies or bows to separtate the two front sections, and begin braiding each section.
5.) Take the two front sections, and add them to the bottom section, and add a hair bow.
6.) Unravel the left over braids from the top sections, and begin making one big braid and add a small clip at the end of the braid.


WARNING: The picture below may be disturbing to some, or just plain ridiculous!!


Yes, this is what she looked like, when she came out of her bedroom. She did ask me if she could play in makeup. I was sooo into watching 16 & pregnant aftershow online that I said "uh huh" not really paying any attention, to what she just asked, but she sure did grab my attention, when she came out her room. I told her she looked BEAUTIFUL!! While I was laughing and grabbed my camera, so I could share this silly moment with all of you lol.

Cool Hair Facts :-)

-Hair grows faster in warmer conditions.
So, if you want to quickly grow your hair, head someplace warm. With this weather, an island vacation doesn't sound too bad lol

Swirl Design-Cornbraids

I wanted to change up the regular straight back cornrows by adding a swirl on the sides of "N's" Hair


1.) Start with detangled well moisturized hair.
2.) I started making two cornbraids in the front of her hair, slightly to the side of her face. So it won't be directly in the front of her face.


3.) Next, I made 6 straight cornbraids going down the center of her hair.
4.) Then, I made a small part on the side of her hair, that went up towards her face, around her edges, and back down going straight, creating a swirl.
5.) The hair that is in the middle of the swirl, I turned it into one braid. It made a very-slight curve, but continued going down the back of her hair.
6.) I followed step number 4 and 5 on both sides of her hair.


I added 5 beads from Curly Princess Hair Boutique to each braid, and sprayed oil sheen and added moisturizer daily on the braids.

Approx time: 1 hour
Products Used: - My handy-dandy Wide Tooth Comb
- Oil Sheen
- Moisturizer

Veil Style Into Cornbraids


This style I did a month ago, and I totally forgot to post it lol. It's a Veil Style going into cornbraids with added pink beads.
Instructions:
1.) I made a part going across her hair, basically ear to ear. I tied up the back section, to get it out of our way, we will use it later.
2.) Starting with the front section I made 3 squares, and I used black rubber bands to separate each square.
3.) I added one pink bead to each section on top of the black rubber bands.
4.) Next, I made 2 twists (two-strand twists) in each square.


5.) Behind my 3 squares, I made 4 smaller squares. I started by making a part in the middle, behind the center square.
6.) Next, the two twists coming from the front center square, I put one going into the second row's square, on the right, and one on the left.
7.) I added rubber bands to secure the twists. I placed two beads, in the two middle sections, and one bead, on the side sections near each ear.
8.) I unraveled the back section of the hair, and made 4 parts going down her hair.
9.) I added the twisted hair into the four sections, and began cornbraiding.
10.) At the end of the cornbraids, I added three beads.
Approx time: 45 minutes-1 hour
Tools Used:
-Wide Tooth Comb
-Pink Jumbo Beads from Curly Princess Hair Boutique
-Black Rubber bands

*I wanted to add, there is a giveaway at beautifulbiracial they are giving away numerous christmas items...Check it out!!
* Also on mommyrantings there is another giveaway going on, your little one could win the book collection of Disney Tangled.

Kandy's (?) Time

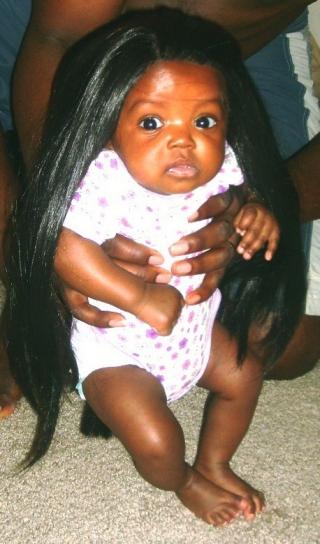
A few posts ago I was discussing age appropriate hairstyles for teens in ("A's") Spotlight. B.B had mentioned in the comments section about babies having a lace front wig. I couldn't picture a baby with a wig, even if, it was for a medical reason. I would just picture a bald headed baby, but I couldn't get my mind off of that subject and on BCC a member showed a picture of this baby.


So here is my question, do you think its okay for a baby to have a wig? Not as dress up for around the house, but for a everyday hairstyle?


"N" Birthday Hairstyle

This is N's Birthday Style, she just turned 6, but going on 40 lol
 She had a great time with her friends and family. I did this style the morning of her party, and let me tell you, she could not sit still. She was overly excited but I managed (thanks to cartoons) to pull something off. Here it goes, I have no idea what the name of this style is, I guess a criss-cross something lol .. Enjoy


I started by making a part going from ear to ear, and another part going straight down her hair. Next I took one of the top half, and divided it into 3 separate sections. I used purple bows to section her hair off.


Next, each of those 3 sections I split them in half, so I had a total of 6 sections. Then I made a cornbraid going down the middle of the 6 sections.


(Here comes the more complicated part, as if, this isn't confusing enough, bare with me lol)
In the section closest to her ear, I took out the hair bow. I began making a cornbraid starting from that section, and when I ran out of hair I began making a regular braid until I reached the section on the other side (which is the second section on the right.)

As you can see, I starting cornbraiding the second section. When I ran out of hair to cornbraid, I began doing a normal braid, coming back over to the right, going into the 3rd right section. So the pattern is going from Right to the Left and then back to the Right. And I continued doing the same process on the other side of her hair. Starting with the Left, going over to the Right, and back to the Left.


In the back of her hair, I did a simple braid.


She thought she was Michael Jackson with her hat on lol. She kept trying to do the moonwalk in the bowling shoes lol, everyone had a good time. 


Her yummy cake ;-)

Click On The Buttons To Follow Me!

Photobucket Photobucket Photobucket Photobucket Photobucket
Related Posts Plugin for WordPress, Blogger...
If you like what you see, and would like to donate, any amount would be greatly appreciated