Sponsors

 photo 8e821ffd-bdb3-44b0-8df1-888119dd6850.jpg
Showing posts with label Curly Updo. Show all posts
3 comments

Twisted Updo


I love browsing pinterest, if you are on it come follow us at http://pinterest.com/kandylandkurls/
I seen this style and instantly knew I wanted to try it out! 
She loved it, and so did I. Now you can try it, in these 7 easy steps. 


Instructions: 
(Click on photos to enlarge)

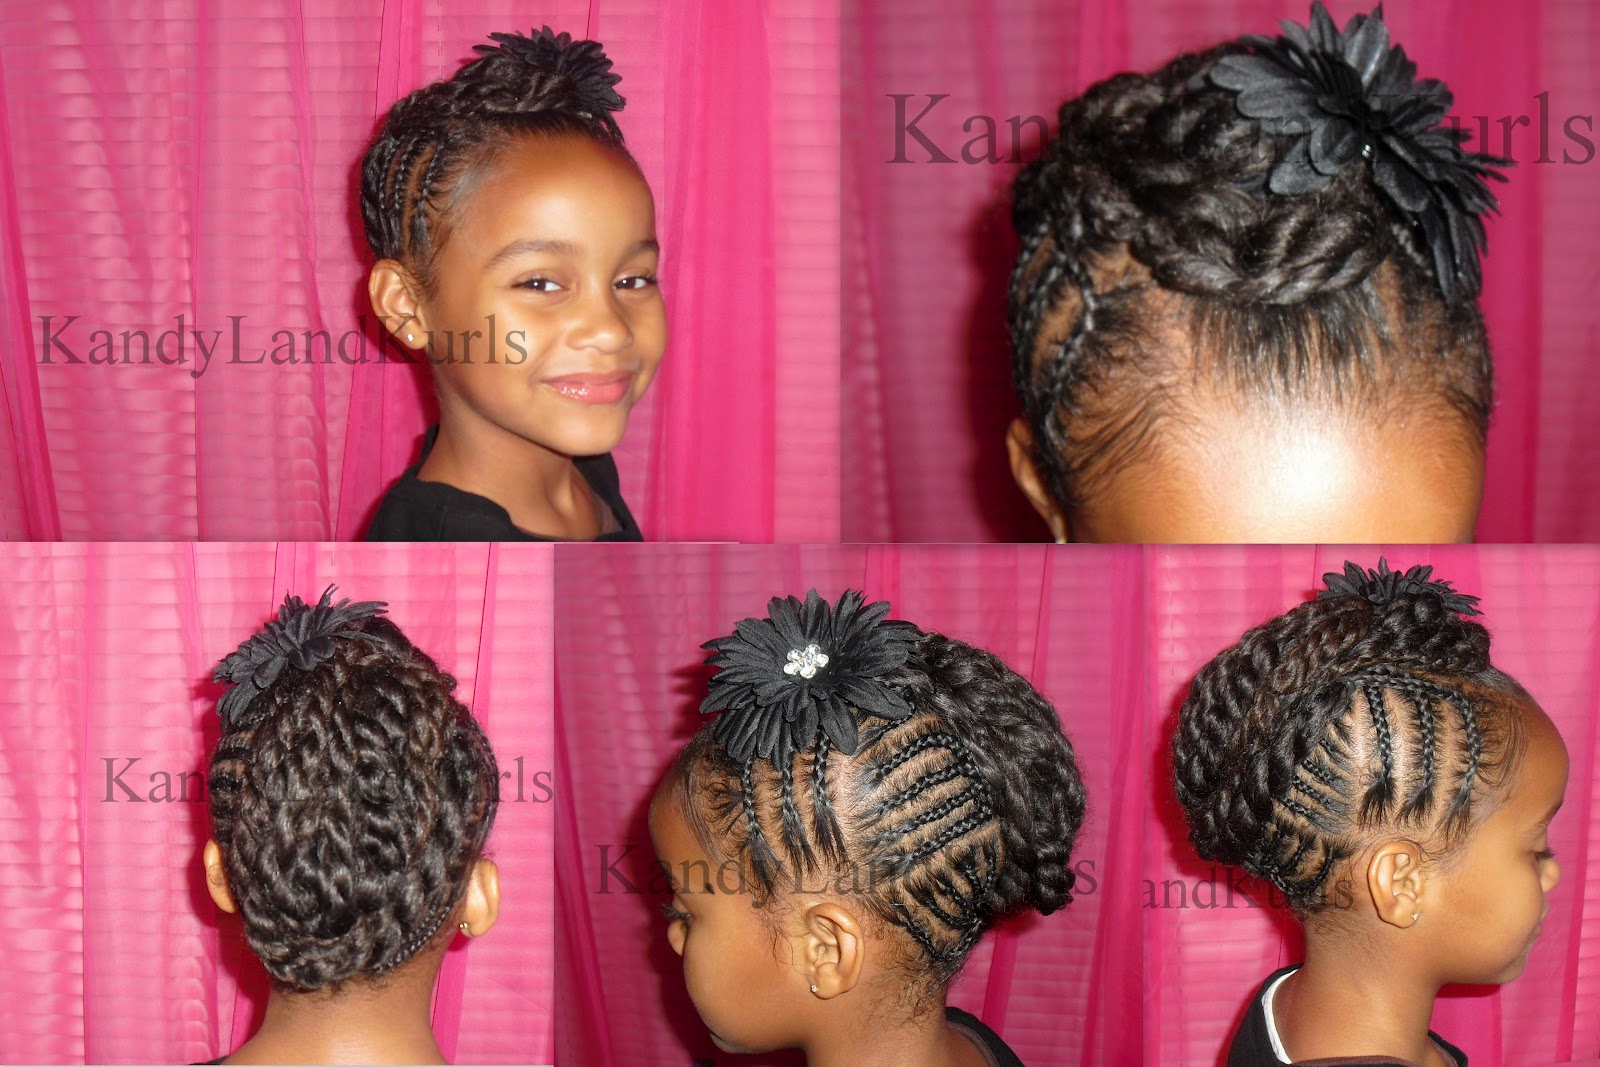
1.) I created 3 cornrows starting from her ear, and I stopped near the center of her hair.

2.) Next, I created 6 smaller cornrows going slanted, again I stopped at the center of her hair.

3.) Finally, I did 5 small cornrows at the bottom of her hair....and yes, I stopped at the center of her hair :)


4.) I repeated steps 1-3 on the other side of her hair. 


5.) In the center section, I made medium-sized two strand twists.

6.) I used several bobbypins to pin the hair in the back, upwards towards the front.


7.) For the front, I swooped the twists across the front section. Then pinned it down. 


We have been obsessed with accessories lately lol. I added a cute black flower, we got from Claires.  


 Products Used: 
Eco Styler Gel mixed with Bee Mine Curly Butter
Bobby Pins

(style maintenance) 
Moisturized daily with Cara B Naturally
Sealed with our Shea Butter Mix

12 comments

Twisted Bun Updo

For the past two days, I've been stumped on what to do on N's hair. I washed, moisturized, and banded, her hair over the weekend. Since, I had a bloggers version of a writers block lol. I decided to just grab a comb and begin freestyle parting. Surprisingly, it came out pretty nice.


I started by dividing her hair in half (ear to ear.) 
I began freestyle cornbraiding, on the back of the hair. I made some swirly kind of parts, and straight. With freestyle parting anything goes, be creative with your parting and just let it flow. 

Once, I reached the hair off of the scalp. I began to form a two strand twist. I twirled my finger and used holding gel to prevent the twists from unraveling.


Once the back was complete, it was time to work on the front. Again, I did not create a clear design. I created random braids, and two strand twist the ends. Remember, the key is focus on your parting. The neater the part, the more nicer the style will become. 

Finally, I placed all of the twists in a ponytail holder. I wrapped the twists to form a bun, and tucked the ends so that it won't show. I used 3 hair ties to secure the bun. 
Tip: You can also use a sock bun or filler to help the bun to look more fuller/thicker.

Simple & Stylish!

 I added the tiara, to show that this style is perfect not only for bigger girls/adults, but even the little ones.
I believe the tiara came with a barbie we brought awhile ago (ekk Im not sure lol )

                                                         
                         Our dog wanted to get some camera love too.              
                  
Products Used: 
(sorry I forgot to post this earlier, duhh Kandy)

Styling: Eco Styler Gel
Washed: Bee Mine Shampoo/Organix Coconut Milk Conditioner
Moisturized: Bee Mine Luscious & homemade shea butter mix.                                                                                                                                                                                                                                                                                                                                                                                                                                                 
2 comments

Curly Updo With Flat Twists

I'm sure some of you have seen this style on Natural-Hair-Care-Info.com for N's feature. Well, I wanted to share it again here for those that didn't see it. I also wanted to tell you that this was my very FIRST time doing flat twists!!! Yes, I knew it wasn't hard and I pretty much got the technique I just never did it, until now, and I think I did a pretty good job! I must add with N's hair type I like cornbraids better, they last longer and look neater to me.


Prep: I washed N's hair the night before, and put her hair into 4 braids to sleep with. In the morning I unraveled the braids.  
 
Instructions:
1.)  I parted her hair from ear to ear (in half /horizontal.)

2.) Beginning with the top section, I made three (3) cornbraids on the sides of her hair, near her ears.
I did this on each side of her ears, so it was a total of 6 braids.


3.) I made 3 flat twists going towards the right, and 4 going toward the left.

4.) Next, I put the back of her hair into a ponytail. I wet the hair in the ponytail with water. Then I added a few sprays of Motions Setting Lotion to the wet hair.


5.) Finally, I added Curlformers all over the ponytail. The next morning I removed the Curlformers and sprayed some Bee Mine Juicy Spritz, and used Bee Mine Curly Butter to smooth down her edges.


Click On The Buttons To Follow Me!

Photobucket Photobucket Photobucket Photobucket Photobucket
Related Posts Plugin for WordPress, Blogger...
If you like what you see, and would like to donate, any amount would be greatly appreciated