African Threaded Corkscrew Twists with Triangle Parts
This week I saw this amazing style "African Threaded Corkscrew Twists" thanks to my friend Shauna. I instantly knew I had to give this a try. I went out the next day, to purchase the items we needed. (they are listed at the bottom) and since there wasn't school on election day, I took advantage of the break, and began this style.
(click on photos to enlarge)
The Vlogger Nadine from GirlsLoveYourCurls has a excellent instructional video, which helped me create this style. So for those who learn better from visuals, please check out the video below.
Now, ours didn't come out exactly like hers. I think it is due to N's hair type. But N's hair when damp/wet shrinks up, which helped it coil better. Sorry I'm jumping ahead. Let's begin with the instructional.
I washed her hair Monday night. She previously had her hair flat ironed. I did our week 4 routine from our hair care regimen (click here to view week 4) Then I braided her hair, and let it air dry overnight. The next day, I unraveled, re-moisturized & sealed.
-I went to Sally's Beauty Supply and purchased dark brown weave thread. To be honest using regular thread will work exactly the same. (**Lightbulb**maybe they are the same..idk)-
2.) Near the root of her hair, just below the rubberband, I began wrapping the thread. This was the tricky part, it was somewhat a pain to make sure the thread was secure. Keep wrapping multiple times until secured.
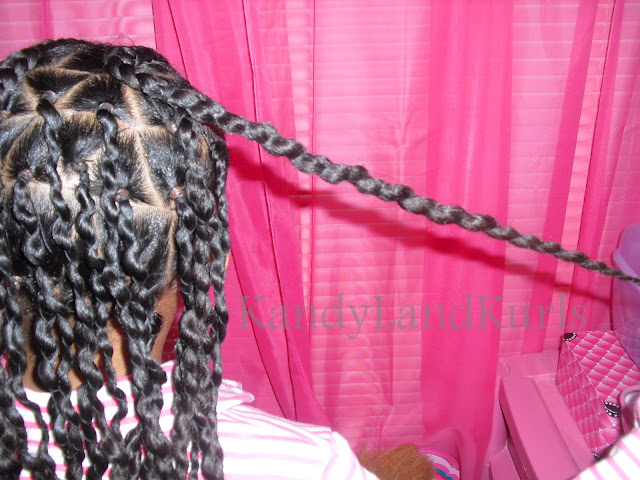
3.) Once the base was secured, I slowly wrapped the thread going down the section of hair. As I wrapped the hair, I found that "twisting" the section of hair as I wrap, helped create the coils. Sliding the hair upwards did not work for us. Also creating medium/large sections looked alot better than smaller sections.
4.) When I reached the ends of her hair. I created a small knot in the thread, by making a simple loop, put the string in the middle of the loop and pull.
5.) After the section was completed, I used our scissors to cut the remaining thread that was hanging.
6.) I repeated this process throughout the back section of her hair.
and this is what it should look like.....
(Tip) For those who may have finer hair. Creating this style on damp/wet hair, may be easier to create the corkscrew effect. Especially if the hair shrinks once dry. This style may look alot better once dry.
7.) In the front, I created simple cornrows that were slanted. When the cornrow lifts off of the scalp, I began wrapping the thread around that part, and continued with step #2-5.
I really love the coiled affect of this hairstyle.
Products Used:
Bee Mine Curly Butter (mixed with) Eco Styler Gel (for styling)
Dark-Brown Weave Thread
Brown Rubberbands
Maintenance
Cara B Naturally Leave In (used daily)
Shea Butter Mix
-Have you ever tried African Threading? If so, how was your experience? If you plan on trying it, please share your photos on our facebook wall, we would love to see.


3 comments
LOVE the look of it!!! on my to try list!!
Love it!!! i must try it!!
Post a Comment
Leave a Comment :)