How To Elongate Your Twist Outs
If you remember our post back in April (click here) when we created our first twist out. You may notice that her twist out, made her hair appear shorter.
Since then, I've been searching for a way to stretch her hair, without messing up the twist out. I stumbled upon Naptural85 video of how she created the best twist out ever.
If you are not subscribed to her channel you are missing out! So I decided to try the method of elongating a twist out on N.
If you are not subscribed to her channel you are missing out! So I decided to try the method of elongating a twist out on N.
Here is our picture of the first twist out, VS the elongated twist out.
Big difference right?! Here's how we did it.
On Saturday night, I gave N a hot oil treatment using coconut oil and washed her hair. (Click on the "Our Regimen" tab above for details on our hair washing routine.)
Sunday I re-moisturized & sealed her hair, then banded her hair.
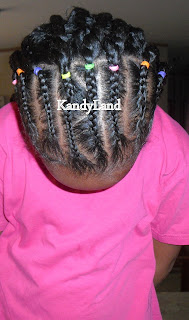
Later on Sunday night, I removed the bands. I cornbraided the front of her hair going straight back, with one zig zag part, and added colorful rubberbands for flair lol.
Instructions:
1.) Starting in the back of the hair, I grabbed a medium sized section and I lightly spritz it with our water/conditioner mix. Remember to spritz the hair lightly, you do not want to fully re-wet the hair or it may shrink back up.
2.) I added a small amount of Blended Beauty Happy Nappy Styles and a little amount of Eco Styler Gel together on the section of hair. I often mix styling products, to achieve definition but not crunchy.
3.) After adding the styling products, I began flat twisting the hair on her scalp. Once the flat twist began to lift from the scalp, I started to create a two strand twist.
Or if you do not know how to flat twist, you can create a regular two strand twist. But make sure to form the twist as close as you can to the root of the hair. The flat twist will help to add more definition to the twist out.
4.) Twirl, the ends of the two strand twist to prevent it from unraveling. Then immediately grab the twist, and form a bantu knot. This will stop the twist from shrinking up, while you continue to do steps (number #1-4) all over the back of the hair.
7.) I tied up her hair for the night, and as she slept her hair dried.
8.) In the morning, I removed her scarf and her hair was still damp (booo.) (But if your hair is dry skip this step.) I used our blow drier on the cool setting, to blowdry her hair. I did not want her hair to shrink up during this process. So I clipped the ends of each twist to help weigh it down.
9.) Once her twists were fully dry, I removed the clips/bobbypins. Then I rubbed some oil in my hands, and rubbed it all over the twists.
10.) I unraveled the twists very gently, to not mess up the twist out definition. And this is our results.....
Stretched/Elongated Twist Out
Products Used (in order):
Blended Beauty Soy Cream Shampoo
Organix Conditioner
Blended Beauty Happy Nappy Styles
Eco Styler Gel
Blended Beauty Oil


18 comments
I love Naptural85 :).
Wow! This looks great! I cant figure out which way I like it more, big and full or long; its good to know that we have the choice though. :)
Her twist out looks so good..if I can ever get twist outs to work for us I will be trying this.
Naptural85 is a hair genius!!! Im subscribed to her and I LOVE how she tries to use all natural products!! Now I know how important it is to look at the ingredients before you buy ANYTHING.
Genius! Brilliant! I want to try this on myself!
LOVE IT! but i have a question, i have a perm and i am trying to take it out but people say that i have to cut my hair in order to take it out,,is it true or?
That looks great! nice definition and hardly any shrinkage, I am going to try this on my next twist out :) Thanks for sharing
Thanks everyone! @Salianas11- Yes it is true. The only way to remove the permed hair is to cut it off. Some people do whats called "transitioning" which is caring for both textures of hair (permed and natural) and they slowly cut off the hair once they reach a length they are comfortable with. I hope this answers your question.
oh those are lovely, I wonder would it be too much to try on tye? hmmm
I love this method! Very pretty turn out.
I love how this turned out. I have to try this out on B soon =) Thank you!
Awesome!!
Very inspired to me
It's gorgeous..
This is soooo beautiful. I will try it this weekend. :-)
Its was amazing im 12 looking for a hairstyles and I told my momma and she was like amazing lol I love ir
Glad you like it sweetie, thanks for checking us out!!!
Wow, I love it! Great method.
Yes it is true
Because your hair is already.chemically altered it cannot revert fully back
Post a Comment
Leave a Comment :)