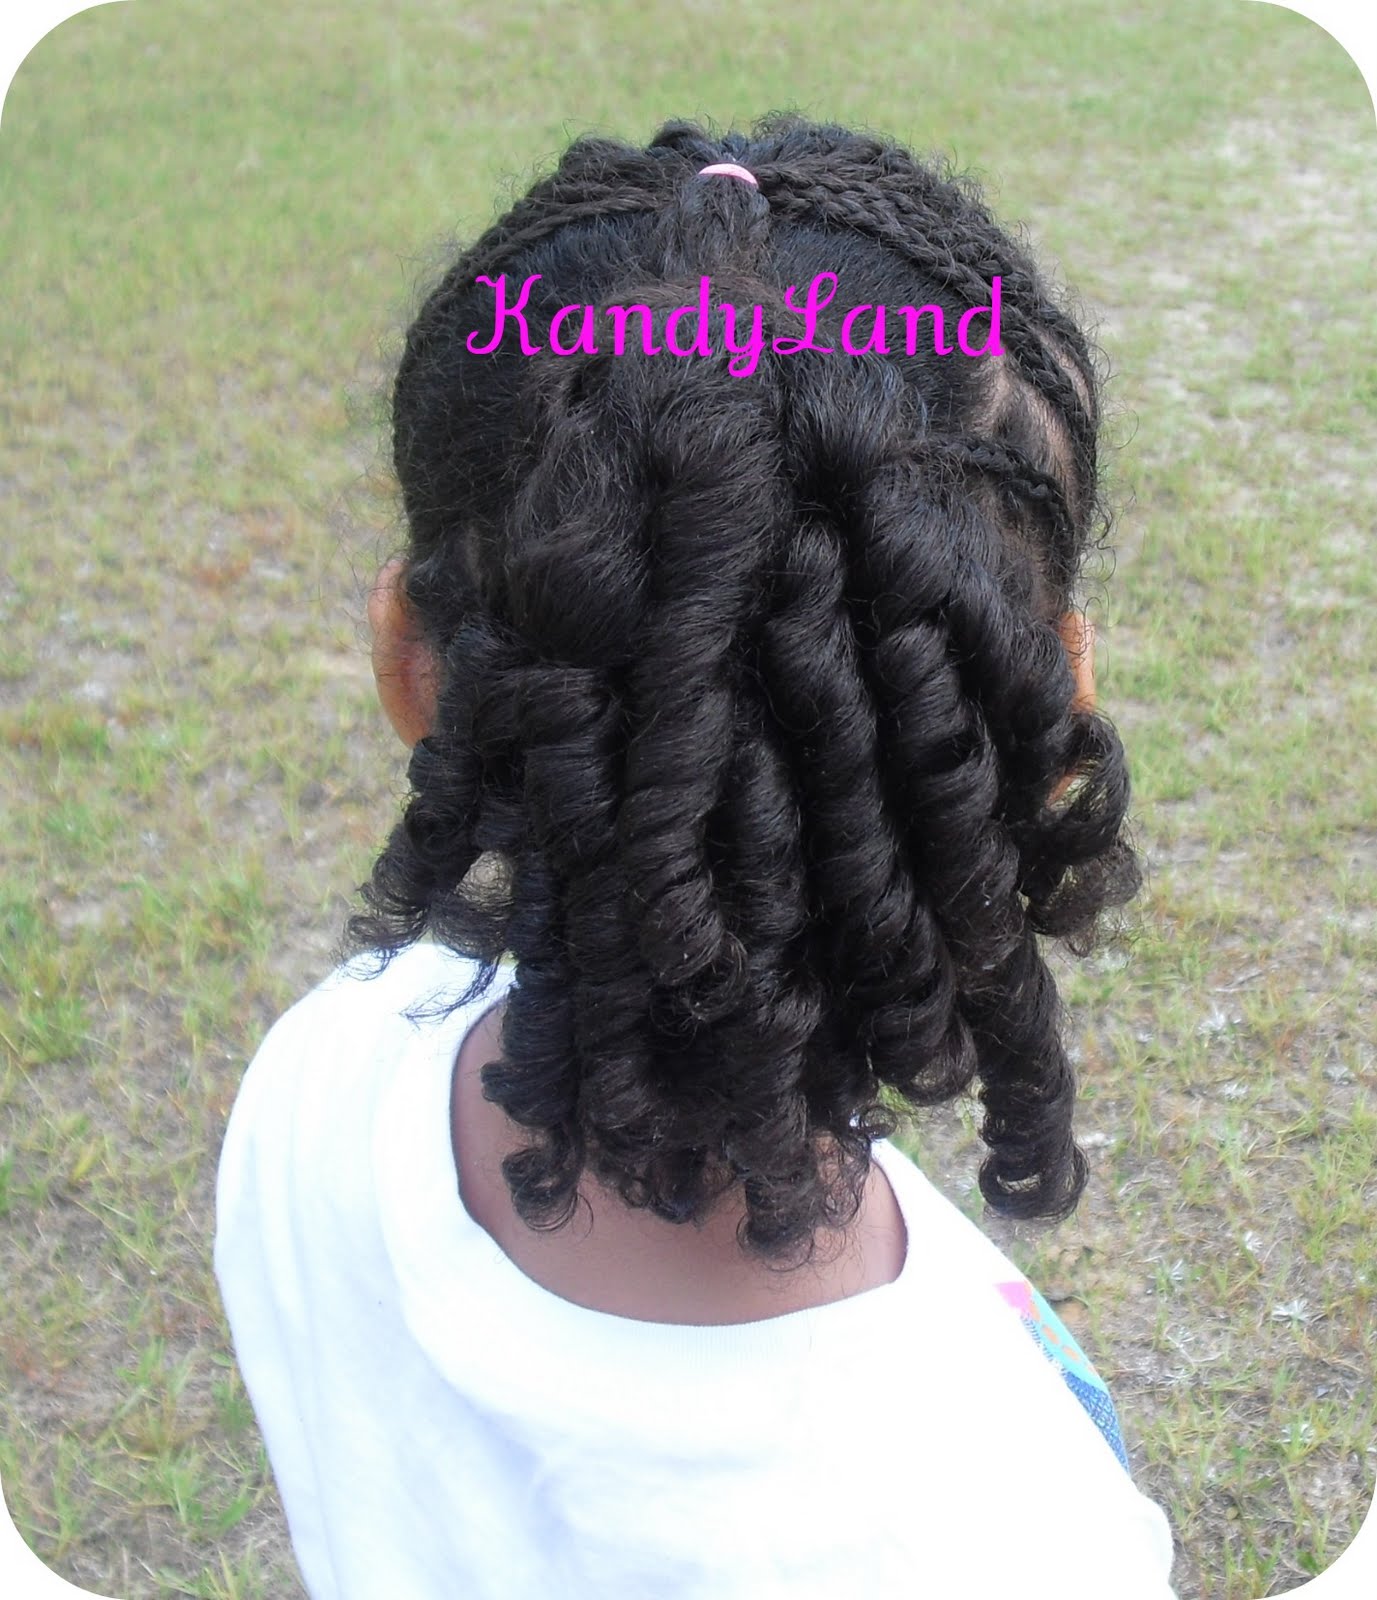
Sponsors

 photo 8e821ffd-bdb3-44b0-8df1-888119dd6850.jpg
Showing posts with label Cornrow designs. Show all posts
12 comments

Twisted Bun Updo

For the past two days, I've been stumped on what to do on N's hair. I washed, moisturized, and banded, her hair over the weekend. Since, I had a bloggers version of a writers block lol. I decided to just grab a comb and begin freestyle parting. Surprisingly, it came out pretty nice.


I started by dividing her hair in half (ear to ear.) 
I began freestyle cornbraiding, on the back of the hair. I made some swirly kind of parts, and straight. With freestyle parting anything goes, be creative with your parting and just let it flow. 

Once, I reached the hair off of the scalp. I began to form a two strand twist. I twirled my finger and used holding gel to prevent the twists from unraveling.


Once the back was complete, it was time to work on the front. Again, I did not create a clear design. I created random braids, and two strand twist the ends. Remember, the key is focus on your parting. The neater the part, the more nicer the style will become. 

Finally, I placed all of the twists in a ponytail holder. I wrapped the twists to form a bun, and tucked the ends so that it won't show. I used 3 hair ties to secure the bun. 
Tip: You can also use a sock bun or filler to help the bun to look more fuller/thicker.

Simple & Stylish!

 I added the tiara, to show that this style is perfect not only for bigger girls/adults, but even the little ones.
I believe the tiara came with a barbie we brought awhile ago (ekk Im not sure lol )

                                                         
                         Our dog wanted to get some camera love too.              
                  
Products Used: 
(sorry I forgot to post this earlier, duhh Kandy)

Styling: Eco Styler Gel
Washed: Bee Mine Shampoo/Organix Coconut Milk Conditioner
Moisturized: Bee Mine Luscious & homemade shea butter mix.                                                                                                                                                                                                                                                                                                                                                                                                                                                 
3 comments

N's Final Protective Style Challenge Hairstyle

This was our final hairstyle during the protective style challenge. I'm sad to see it end, but we plan on having another one later this year so be on the lookout! During this challenge, I fell in love...with...twists lol. Twist last longer in N's hair than braids, but I missed our cornbraids. I decided to do both style in her hair. 


 I washed and banded her hair over a 2 day period. I started in the back of her hair. I grabbed medium sized sections. I applied Beija Flor Naturals Creme Brulee and eco styler gel to each section. Then I began creating 2 strand twists all over. 


For the top section, I didn't have a design in mind. I just started creating 3 slanted cornbraids. I stopped them mid way while cornbraiding and braided them to the ends, to create a side bang. For the rest of her hair, I made slanted lines and angles and cornbraided them.  To finish the style, I added beads and she requested her Twirlyz on her twists.


 She loves her Twirlyz! Don't forget to use our code: "Kandy" to save on your order. Also they are having a sale you can get $20 worth of Twirlyz for only $10! Click Here for details.

Products Used: 
Beija Flor Naturals Creme Brulee (REVIEW COMING SOON!)
Eco Styler Gel
(Moisturized daily with Cara B Naturally Spray & Leave In)
5 comments

Quick Cornbraid Style

I had exactly one hour until N's bedtime, so I quickly did this cornbraid style. It took exactly one hour and 14 mins, so she wasnt too late for bed. I did the front section of hair in side braids. Next, I did the back of her hair in two (2) rows of cornbraids. I added the beads in the morning. 


The bottom layer of cornbraids is longer than the middle section.


Cute & Simple!

Products Used:
 Eco Styler Gel
Cara B Moisturizing Hair Mist (sprayed in the morning.) REVIEW SOON

This style lasted 2 weeks.

Note: We are getting ready for our protective style challenge, so this style is a great style idea for those participating.
8 comments

Two Layered Cornbraids With Twists

As I was going through our hair care photo album. I stumbled upon this style, I totally forgot to show everyone. I did this style during the summer. I've been doing low maintenance styles to promote growth. So nothing too fancy lol. But here it is, two (2) rows of cornbraids and twists coming out of the top section.


Products Used: 
Darcy Botanicals Shea Butter/ Hibiscus Spray
Eco Styler Gel 

Approx Time: 1 hour
8 comments

Braidout & Cornrows

Since school began, we still haven't quite got into the swing of things. We are always rushing out the door. One of the problems is hair time. I decided to style her hair on Sundays, and leave it in for the week, and then wash on Saturdays. Since we started doing this, we saved a good amount of time in the mornings. Here is our style for the week.


1.) I parted her hair ear to ear.

2.) Starting in the back of her hair, I wet it with our spray bottle and make 4 large braids. 


3.) In the front of her hair, I made a swirl part. I started the swirl from the front of her hair, going towards the center.

4.) I made a cornbraid around the swirl.

5.) I repeated step # 3 on the other side of her hair.

6.) Inside of the (2) swirls, I created 5 small cornbraids (starting from the left) going towards the center of her hair.

7.) I made 5 more cornbraids (starting from the right) going towards the center of her hair. -FYI: I did the opposite of step #6.-

8.) I gathered her hair from center of the swirl (total of 10 braids.) I combined them into one large braid.


9.) On the sides of her hair, I made two cornbraids going down towards her ear.

10.) I added some beads and combined the two braids.

11.) I did the same on each side of her hair.


12.) In the morning, I unraveled the 4 braids in the back and made a ponytail.

Approx Time: 1 hour

FYI: This style lasted 6 days.

Products Used:
Spray Bottle
Beads
Shea Moisture- Curl Style Milk
Darcy Botanical Coconut & Hibiscus Oil Spray (for shine.) 
14 comments

Cornbraids & Two-Strand Twists

So far in this school year, we've been doing more protective styles. It saves us much more time in the mornings, vs styling daily. I brought a new product that has been helping tremendously with making her styles last longer, with very minimal frizzies. The cornbraid design was a freestyle. 


Here are some quick instructions on how I achieved this look.

1.) I made sure her hair was well detangled.

2.) I parted her hair from her temple, on the side of her head, to the other side.


3.) I started in the back of her hair. I took a section with my fingers, no comb, and sprayed it with my water/conditioner mix.

4.) I added some Eco Styler Gel, and Bee Mine Curly Butter to a section. Then I began making medium sized two-strand twists.

5.) When I reached the ends of the twists, I wrapped the hair around my finger a few times. This created a slight curl, and that helps to stop the twists from unraveling.


6.) I continued twisting until the entire back section was complete. Again, I did not use a comb to section the twists just my fingers.

7.) Next, beginning with the top section. I made a small "rainbow shaped" part on the side of her hair.

8.) I made a cornbraid around the rainbow shaped part. 

9.) I continued making 3 rainbow shaped braids.

10.) I finished the rest of the hair on top, by creating braids with a slight curve.


11.) To maintain the look I sprayed with Darcy's Botanical's Coconut & Hibiscus Oil Spray.

Products Used: 
Eco Styler Gel (Review Coming Soon)
Bee Mine Curly Butter

Total Time: 1 1/2 hours
3 comments

2nd Day Of School Hairstyle: Braidout Pigtails

For the second day of school, I decided to make a cute braidout pigtails. It was very simple.
 I just made a straight part going down her hair. Then I wet the hair with my spray of water&conditioner mixed. I also added Darcy's Botanical's Shea Butter Moisturizing Cream. I made 2 braids in her hair. In the morning, I unraveled the braids and gently separated her curls.


I also added Darcy's Botanicals Coconut & Hibiscus Oil Spray for shine. If you don't know by now, Darcy is now added to our routine! I absolutely love it! Want another chance to win some? Click here Darcy's Botanicals is having a contest, it ends Sept 16th.


How did you style your little one's hair for back to school? 
Feel free to share your photos on our facebook wall, just click upload photo. 
4 comments

1st Day Of School Style

N is now a First Grader!! I can't believe how fast my baby is growing up! She has already made a 100 on her first test, and is in the safety patrol. She is having a blast at school! I'm still adjusting to her school schedule. Well, I skipped ahead and I haven't shared her hairstyle for the first day of school. N wanted cornbraids and I wanted a braidout, so we met in the middle and combined the two. Here it is...


 Please ignore all of the shine on her hair, I promise it was not that greasy, it's the flash lol.


I did not have a cornbraid design in mind, I just freestyled.


Her braidout got a little wet on her ends, from the shower.


Products Used:
Darcy's Botanicals (Giveaway going on right now, click here to enter)
 (Coconut&Hibiscus Oil + Detangling Milk) 
2 comments

Curly Updo With Flat Twists

I'm sure some of you have seen this style on Natural-Hair-Care-Info.com for N's feature. Well, I wanted to share it again here for those that didn't see it. I also wanted to tell you that this was my very FIRST time doing flat twists!!! Yes, I knew it wasn't hard and I pretty much got the technique I just never did it, until now, and I think I did a pretty good job! I must add with N's hair type I like cornbraids better, they last longer and look neater to me.


Prep: I washed N's hair the night before, and put her hair into 4 braids to sleep with. In the morning I unraveled the braids.  
 
Instructions:
1.)  I parted her hair from ear to ear (in half /horizontal.)

2.) Beginning with the top section, I made three (3) cornbraids on the sides of her hair, near her ears.
I did this on each side of her ears, so it was a total of 6 braids.


3.) I made 3 flat twists going towards the right, and 4 going toward the left.

4.) Next, I put the back of her hair into a ponytail. I wet the hair in the ponytail with water. Then I added a few sprays of Motions Setting Lotion to the wet hair.


5.) Finally, I added Curlformers all over the ponytail. The next morning I removed the Curlformers and sprayed some Bee Mine Juicy Spritz, and used Bee Mine Curly Butter to smooth down her edges.


9 comments

Twisted Updo

Lately, I have been searching through tons and tons of websites, and I was inspired by the all the Natural Divas I've seen. I decided to do a child version of one of the hairstyles I seen. I just call it a Twisted Updo, it's a blend of cornbraids & two-strand twists.


Instructions:

The first image is how I parted her hair.

The brown section represents the hair, that I used to made small two-strand twists.

The black lines going towards the brown section are cornbraids. 


Once the two-strand twist were complete, I used black bobby pins to secure her twists in a bun shape.

She loves some sort of braid or twist in the front of her hair. So I left a piece out, and created (2) two strand twists.

Then, I twisted them both together to form one big twist.

Finally, I added small colorful snaps to make it look more playful.

Products Used:
Bee Mine Luscious Moisturizer
Coconut Oil
Approx Time: 1 Hour


The sun was in her eyes lol

8 comments

Circle Braid/Beehive Style


This is my Circle/Beehive Braid, I wanted to make one continuous braid. I started in the back of her hair and ended in the middle. I didn't post the instructions because all I did was make one cornbraid throughout her hair. But if anyone has any questions, or want the instructions, feel free to email me at kandylandkurls@yahoo.com


 Do you remember this flower? It's the wonderful flower that is from A Mother's Love Blog, she sells adorable handmade bows. N wanted me to clip the flower in the middle of the circle.


N's surprised face at Girl Scouts, she was shocked that I had a camera with me.

 
Goofing off at the Zoo.
 
So what is your little one's up to this summer?
7 comments

Blooper Star Style

I am not a professional hairstylist, I try my best to be creative. I wasn't going to post this hairstyle, but I said to myself "Hey, we all should be able to laugh at ourselves once in awhile." This is my first attempt of making a shooting star in her hair. I think it came out cute but as you can see, it came out resembling the star of david lol.


Here is a picture of the star of david
This is the star I was trying to make.

I stink at drawing stars on paper, but I'm determined to master this star! I will dust myself off and try again.
3 comments

Update: On Cornrow Styles With Zig-Zag Parts

Here is a quick update on N's Zig-Zag cornrow style, click here to view the original style.
I removed the rubberbands on the sides, because I really don't like to leave rubberbands, beads, or ponytail holders in her hair for more than a few days. I also removed the two braids in the back of N's hair, and this created a beautiful braid out. Then I sprayed a little bit of Bee Mine Juicy Spritz and she was good to go.


I wanted to show you N's shirt, if you are looking for clothing to promote natural hair for your princess. Come visit http://www.naturalhairwear.com/index.html to check out the wonderful selection that's available.
5 comments

Cornrow Style: With Zig-Zag Parts

This week we had family visiting from out of town. I wanted to do a style that wasn't too time consuming, but still very cute. N wanted cornbraids, so instead of having cornbraids throughout her entire hair, I decided to just do the top half.

Instructions:

1.) I divided the hair in half (ear to ear.)

2.) Beginning with the top section, I made two zig-zag parts.

3.) Next, I made a cornbraid using the hair in the middle of the zig-zag parts.

4.) I continued making zig-zag parts, and braiding the hair in the middle, until I have completed 5 braids.

5.) On the sides of the hair, I made 6 small box sections ,and added pink rubberbands to each section.

6.) Then, I gathered all of the left over hair, and began making one big two-strand twist. 

7.) In the back section, I put the hair into a ponytail.

8.) Finally, I made two braids and added a blue butterfly clip.


Approx time:45 minutes

Products Used:
Bee Mine Luscious Moisturizer
Suave Naturals Almond+Shea Butter Conditioner
(Shampoo: Review is coming soon)
 Wide Tooth Comb
Hair accessories

Click On The Buttons To Follow Me!

Photobucket Photobucket Photobucket Photobucket Photobucket
Related Posts Plugin for WordPress, Blogger...
If you like what you see, and would like to donate, any amount would be greatly appreciated