Sponsors

 photo 8e821ffd-bdb3-44b0-8df1-888119dd6850.jpg
Showing posts with label Mohawk Style. Show all posts
3 comments

Twisted Updo


I love browsing pinterest, if you are on it come follow us at http://pinterest.com/kandylandkurls/
I seen this style and instantly knew I wanted to try it out! 
She loved it, and so did I. Now you can try it, in these 7 easy steps. 
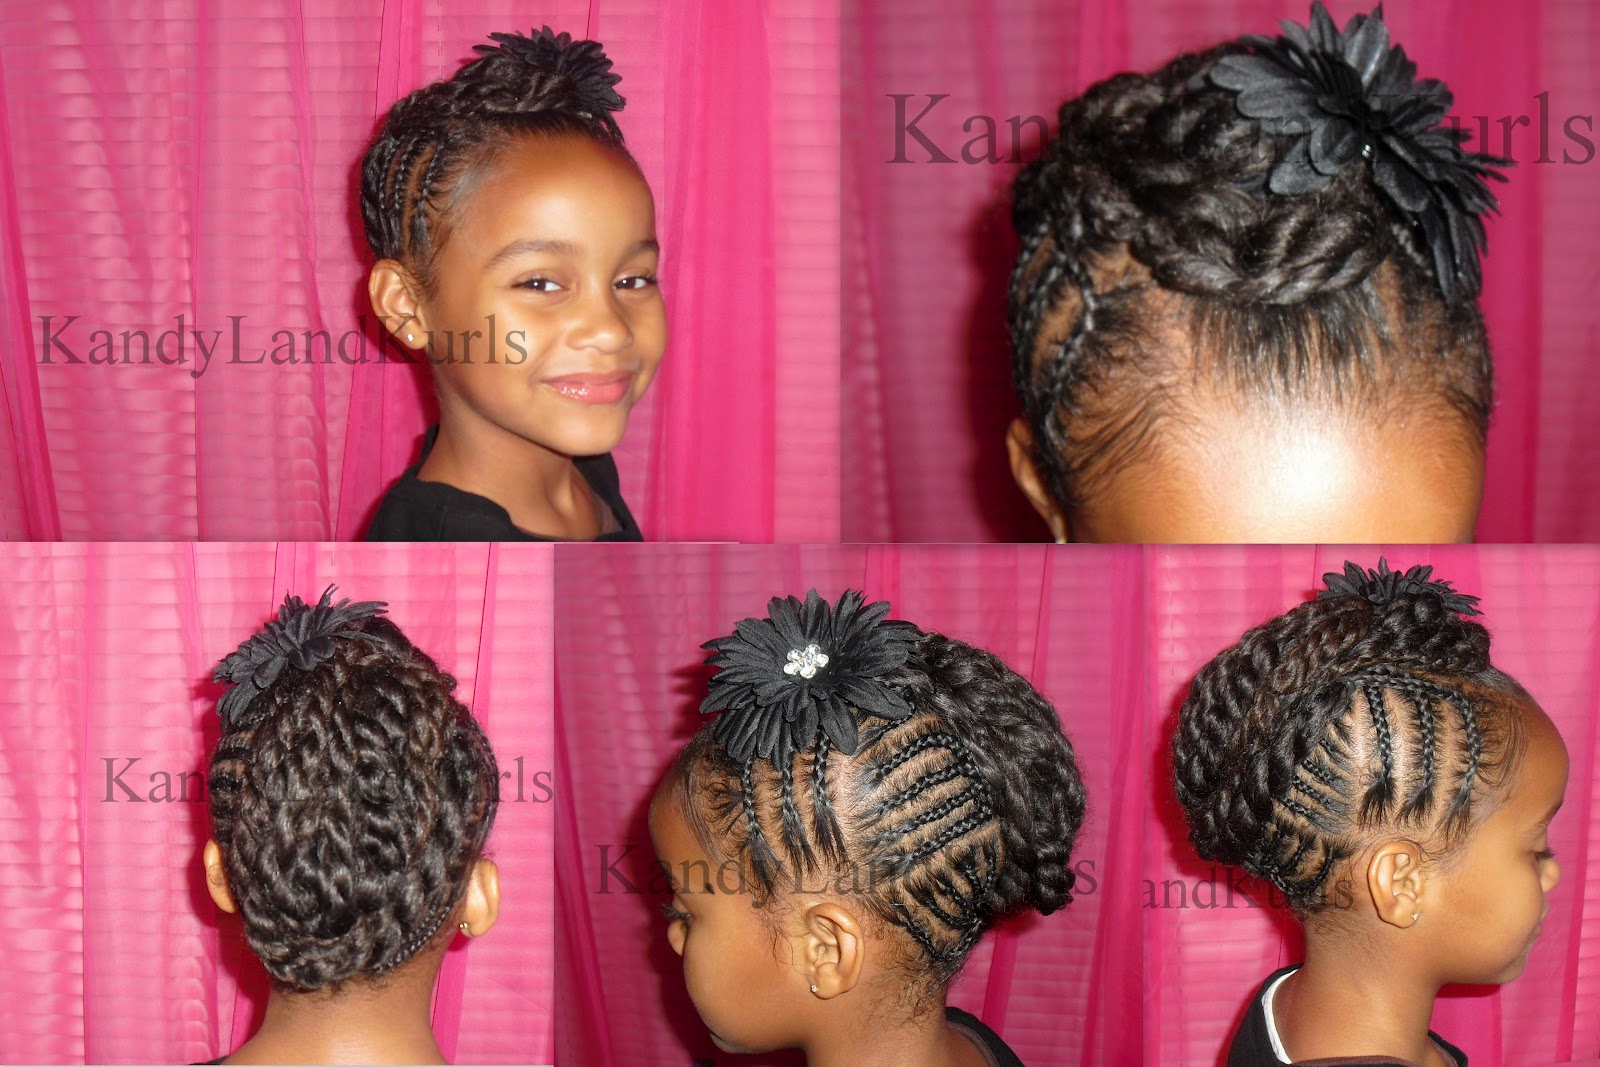

Instructions: 
(Click on photos to enlarge)

1.) I created 3 cornrows starting from her ear, and I stopped near the center of her hair.

2.) Next, I created 6 smaller cornrows going slanted, again I stopped at the center of her hair.

3.) Finally, I did 5 small cornrows at the bottom of her hair....and yes, I stopped at the center of her hair :)


4.) I repeated steps 1-3 on the other side of her hair. 


5.) In the center section, I made medium-sized two strand twists.

6.) I used several bobbypins to pin the hair in the back, upwards towards the front.


7.) For the front, I swooped the twists across the front section. Then pinned it down. 


We have been obsessed with accessories lately lol. I added a cute black flower, we got from Claires.  


 Products Used: 
Eco Styler Gel mixed with Bee Mine Curly Butter
Bobby Pins

(style maintenance) 
Moisturized daily with Cara B Naturally
Sealed with our Shea Butter Mix

4 comments

Flower Braid & Mohawk


(click on photos to enlarge) 

I pre-pooed, washed, conditioned, and put her hair into 4 braids to dry overnight. 
In the morning, I removed the braids. I saw this cute flower on a youtube video, and a friend at N's school had his hair cut into a mohawk. So N begged me to put a mohawk in her hair too. I decided to do both styles, why not?! lol


Starting in the back of her hair, I created one braid on the left, going to the center of her hair. I stopped the braid once I reached the center. I did the same thing on the right and stopped at the center. Also I wanted to do uneven sized braids to create the mohawk. One braid is small, the next is big (and repeat) to create that effect. 


Once I reached the top section of hair. I used eco styler gel and a black hair tie, to create a simple side ponytail. Inside the ponytail I made 4 braids.


To create the flower petals, I create a simple loop by using one of the 4 braids. I tucked it into the hair tie. I continued doing this to each of the 4 braids. Since her hair is long, I had to create 2 loops with one braid. I wrapped the ends of her hair around the hair tie to hide them. 

FYI: You can use a bobby pin to secure the flower petals to the scalp. 


Here is the tutorial I used to create the flower. I made ours larger, since N's hair is thicker. 


The tutorial says to use a rubberband to create the flower petals, but since we are in the BeadsBraidsBeyond Protective Style Challenge, I could not use rubberbands. Instead I used a black hair tie to secure the flower petals.   


I finished her mohawk by creating one large braid. 


*Bonus Pic* Our new 8 week old chihuahua! 


5 comments

Protective Style Challenge: Update (Week 4-5)

We are half way done with the Protective Style Challenge!! Can you believe that? N had her hair in this style (click to see.) During the week we spiced up that same hairstyle, and added some flair. She rocked a twisted updo, and little buns, along with one long braid (which is not pictured.) 

-Ignore the frizzies-


The women in the challenge are doing such amazing styles! And are helping each other with tips, styles, and  much more. It feels like a mini facebook family lol.  
We also shared photos of our children's length check. I never measured N's hair before, so it was pretty cool to see how long it is. I plan on measuring again when the challenge is over, to see if we have any growth. 


-sorry it's blurry, but I copied the rulers number in white font.-

-It's pretty difficult to take a pic and hold the ruler & hair haha-

Shrinkage is CRAZY! I never would of thought that her hair was almost 19 inches when stretched.

Have you ever measured your child's hair? Where you shocked by the results? 
4 comments

Protective Style Challenge: Mohawk

After being inspired by the 66 very TALENTED ladies in our protective style group. Yes, they all can hook up some hair lol. I just had to do the mohawk again! I really like how this came out.


The design was a freestyle. I guess a swirl/heart thing? Idk..lol


To recreate this style we pretty much did the same steps in this older post (click here for step by step instructions.)


Products Used: 
Eco Styler Gel 
Cara B Naturally Spray
 Total Time: 2 hours 20 mins
6 comments

Updated Twisted Updo

Here's a quick update on our style. I took the bun out and added 4 colorful rubberbands to the twists, which formed a mohawk.


We had a fun day at the park, and she received a compliment on her hairstyle from a few strangers. "N" has told me that this is her favorite style! So I may do this for the first day of school which is right around the corner. I can't believe summer vacation is half way over for us : (
How is everyone enjoying their summer so far?  


9 comments

Twisted Updo

Lately, I have been searching through tons and tons of websites, and I was inspired by the all the Natural Divas I've seen. I decided to do a child version of one of the hairstyles I seen. I just call it a Twisted Updo, it's a blend of cornbraids & two-strand twists.


Instructions:

The first image is how I parted her hair.

The brown section represents the hair, that I used to made small two-strand twists.

The black lines going towards the brown section are cornbraids. 


Once the two-strand twist were complete, I used black bobby pins to secure her twists in a bun shape.

She loves some sort of braid or twist in the front of her hair. So I left a piece out, and created (2) two strand twists.

Then, I twisted them both together to form one big twist.

Finally, I added small colorful snaps to make it look more playful.

Products Used:
Bee Mine Luscious Moisturizer
Coconut Oil
Approx Time: 1 Hour


The sun was in her eyes lol

No comment yet

Twisted Mohawk

Here is a quick style to do, when taking the little one to school!!! The Twisted Mohawk!! I started with well moisturized detangled hair, I parted the hair into 3 horizontal/ear to ear sections, and then tie it off with a clip/pony tail holder. 

Then starting at the bottom, divide the section (in the ponytail holder) into 3 parts. I then took 1 of the three sections and twisted it, by placing the right section over the left and so on... until I reach the end of the hair.

I added the little hair clips at the end of each section, so I had a total of 3 different twisties. I did this to the other 2 sections of hair (the middle and the top) and VOILA all done!!  approx styling time: 20 mins


Click On The Buttons To Follow Me!

Photobucket Photobucket Photobucket Photobucket Photobucket
Related Posts Plugin for WordPress, Blogger...
If you like what you see, and would like to donate, any amount would be greatly appreciated